Creating a Self-Service Course Certificate
Ian Justin, GetConnect
Expertise Level: Intermediate
Prerequisites
A trial or full subscription version of Adobe Captivate. For a trial of Adobe Captivate click here and to add a subscription to your Connect account contact your GetConnect Account Executive.
The Big Picture
There are occasions where you will want to have your attendees or learners create their own certificates. This can be carried out manually of course by downloading a CSV of the passing group and using a certificate generation program to create and send the certificates to them. There is a relatively simple option in Adobe Captivate that allows you to create a certificate that is a little more ‘self-service’.
In the end, this process will create a piece of content on your Connect account and of course a URL. You could send the URL to those who are qualified for the certificate, or you could include it as the last module in a curriculum so that only those who make it that far have access to the certificate. If you are using Connect Events you could either send it to qualified/certified attendees (using the rules you can create in the Connect Events tool, see here for details on Connect Events reporting metrics) or just include the link in the emails sent to those who attended the session (and not to those who were ‘absent’).
The Process
There are certificate ‘widgets’ available in Captivate, but they are limited to specific templates and I was aiming to create a simple way to use your own certificate designs and have the user populate them with their own personal information. To do this you will create a ‘responsive project’ in Captivate, in the first slide create a text entry box where you will enter your name and then on the second slide you will add your certificate image. Over that image you will add boxes that add the name text from the first slide, an automated date field and other fields as required.
Here is the example URL from the project we have used in this tutorial: https://getconnect.adobeconnect.com/ssce/
Let’s get started.
Caveat – I am not a Captivate expert, I am barely a Captivate user, you may have far better ways to achieve the actions below.
Create your Captivate Project
Open Captivate and select the ‘Responsive Project’ option, then ‘Create’. I suggest you scale the project to match the resolution and aspect ratio of your certificate and I did this by first looking at the resolution of my certificate .jpeg and then moving the resolution slider at the top of the page and changing the height of the slide in the ‘Properties ‘ section.
Add your personal certificate - Create a second blank slide in your project and paste your certificate image onto that slide (Figure 1 below). In order to print the completed certificate more easily and avoid sections being cut-off by the print margins, I suggest you shrink the certificate image to leave a clear border/margin around the certificate (Figure 1a). Figure 1
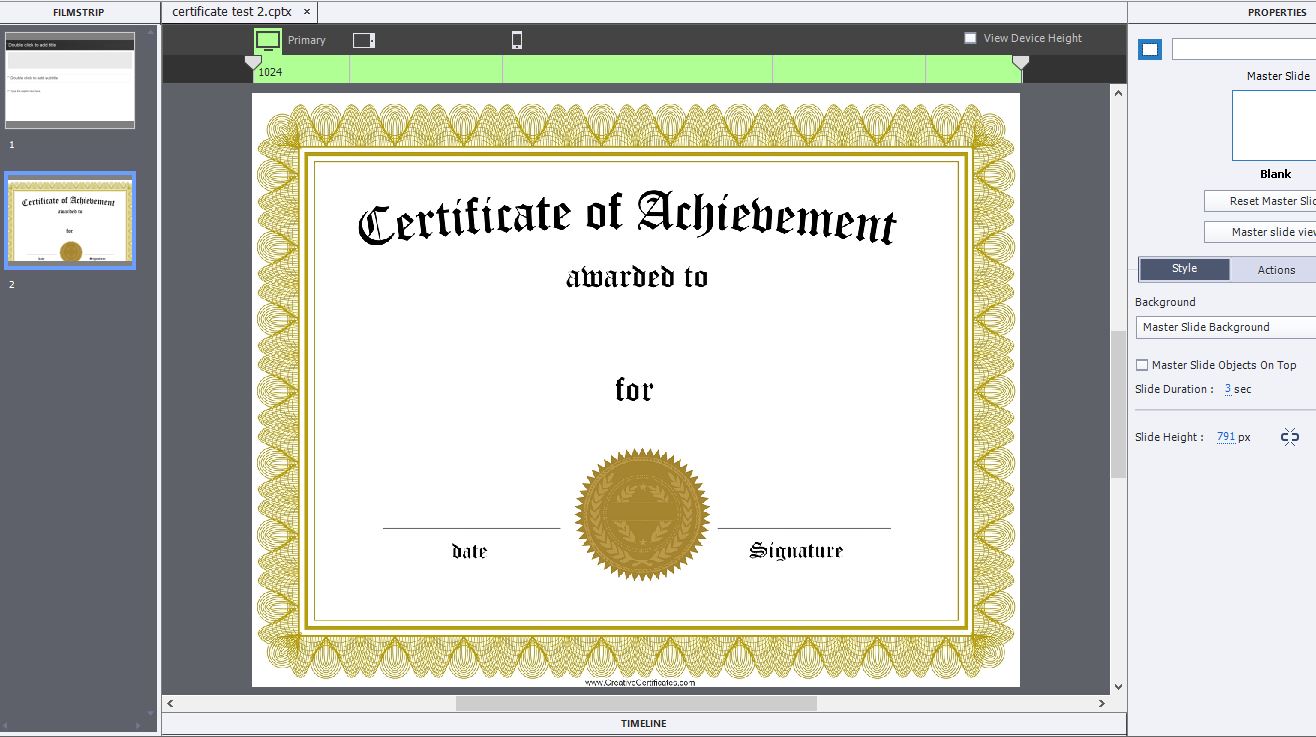 Fig. 1
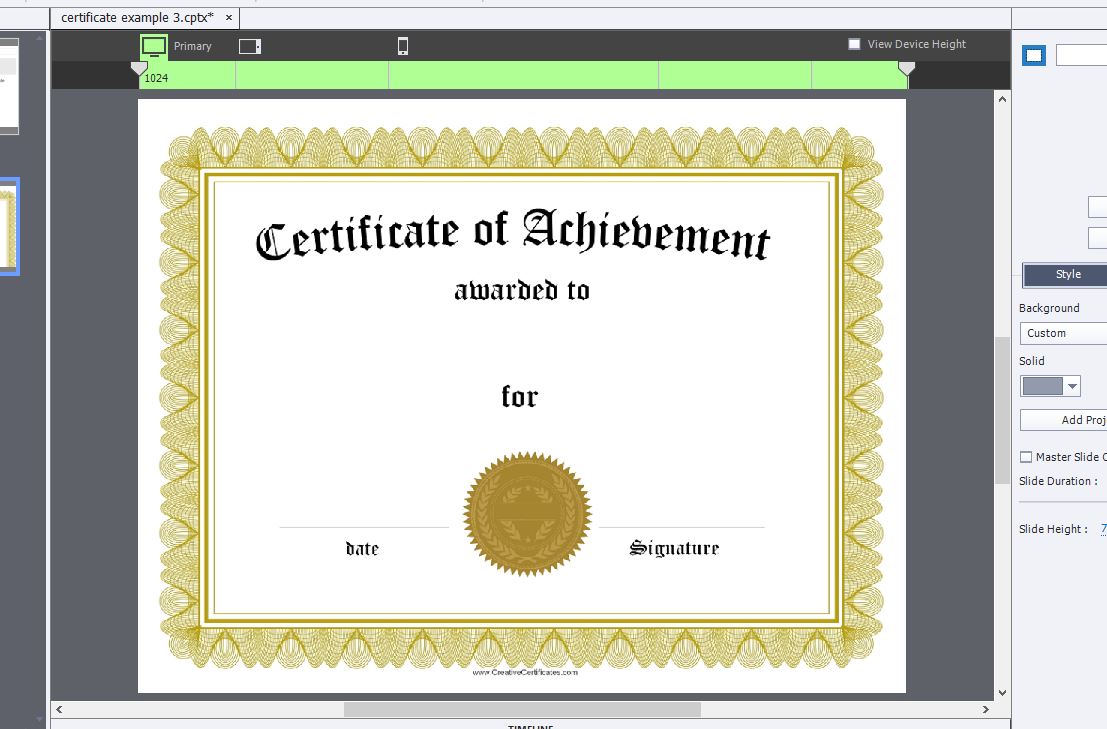 Fig. 1a
Add your ‘Text Entry Box‘ – Move back to slide #1 and right-click in a free area of the slide and select ‘Objects’>’Text Entry Box’. The box and the ‘Submit’ button will be added to your slide. You can edit the box by selecting it and moving/resizing it and changing the properties on the right-hand side. Similarly with the ‘Submit’ button. Also add some directions as a simple text box above the Text Entry Box (Figure 2).

Fig. 2
Create a variable – Now we will ensure that the text entered into the field is remembered and can be retrieved for the certificate field. Select the ‘Text Entry Box’ and then in the right-hand ‘Properties’ section select the ‘[X]’ beside the ‘Variable’ field and in the new box add a variable for the name of the person. In my case I have created a variable ‘username’ and click ‘OK’. My gut tells me to also ensure the option ‘Retain Text’ is checked as well (Figure 3).

Fig. 3
Add the field to ‘receive’ the text to the certificate – Move to the second slide where you have the certificate and again right-click and this time select ‘Objects’>’Text Caption’. Move the new ‘Text Caption’ box to the name section of your certificate, resize it and change the font to suit your needs from the right-side ‘Properties’ section (Figure 4).

Fig 4.
Now double-click to select all of the text in the ‘Text Caption’ box and the small ‘[X]’ in the ‘Properties’ section will be available to you. Click on the ‘[X]’ and from the ‘Variables’ menu select your new variable, in my case ‘username’ (Figure 5). It is also a good idea to set the field ‘Maximum length’ to say 50 characters, that should be enough for most names. When you are finished the ‘Text Caption’ field will change to display ‘$$username$$’ (Figure 6).
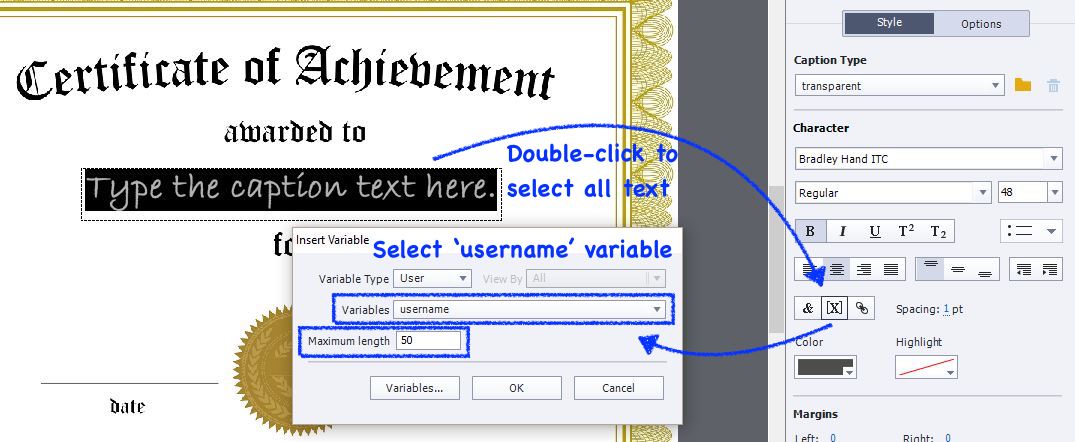
Fig. 5
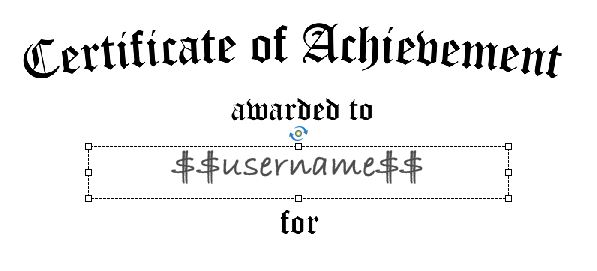
Fig. 6
Repeat the process above to add other user-defined variables. Of course you may want to hard-code fields such as the name of the course into the certificate with a regular ‘Text Caption’ box.
Add an automated date field to the certificate – You can also have the data for the certificate pre-populated in a similar manner, but in this case you will use a system variable. In the certificate slide, again right-click and add ‘Objects’>’Text Caption’. Format the text as noted above and position it over the date field in the certificate. Double-click to select all of the text and again click on the ‘[X]’ icon. This time select the ‘Variable Type’ as ‘System’ and select one of the date variables listed there. The variable ‘cpInfoCurrentDateString’ will display a clean ’12/8/2017′ for example (Figure 7).
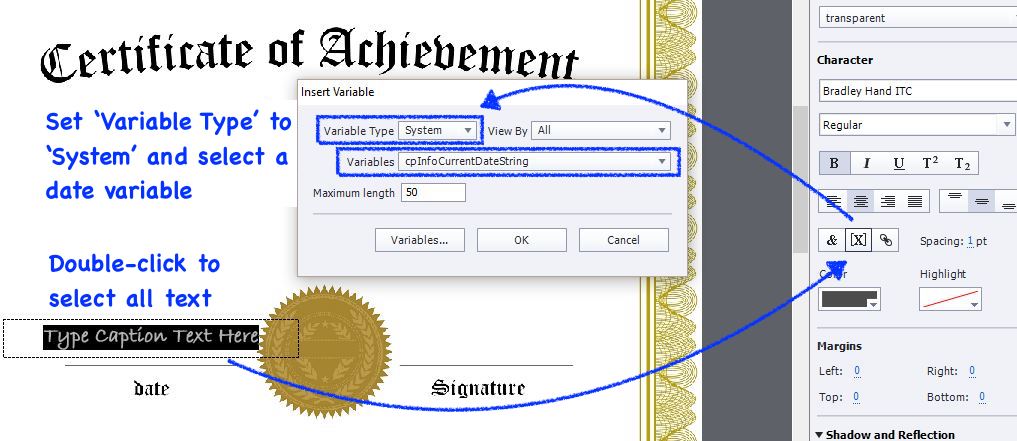
Fig. 7
Remove the play-bar from the final version – You will want to remove the play-bar from the final file as you do not want them to print the play-bar and it is not necessary in this use-case. To do this go to the ‘Themes’ menu and select ‘Skin Editor…’. in the next dialogue box, deselect all of the play-bar components (or simply select ‘Show Playback Controls’) and close the dialogue (Figure 8).
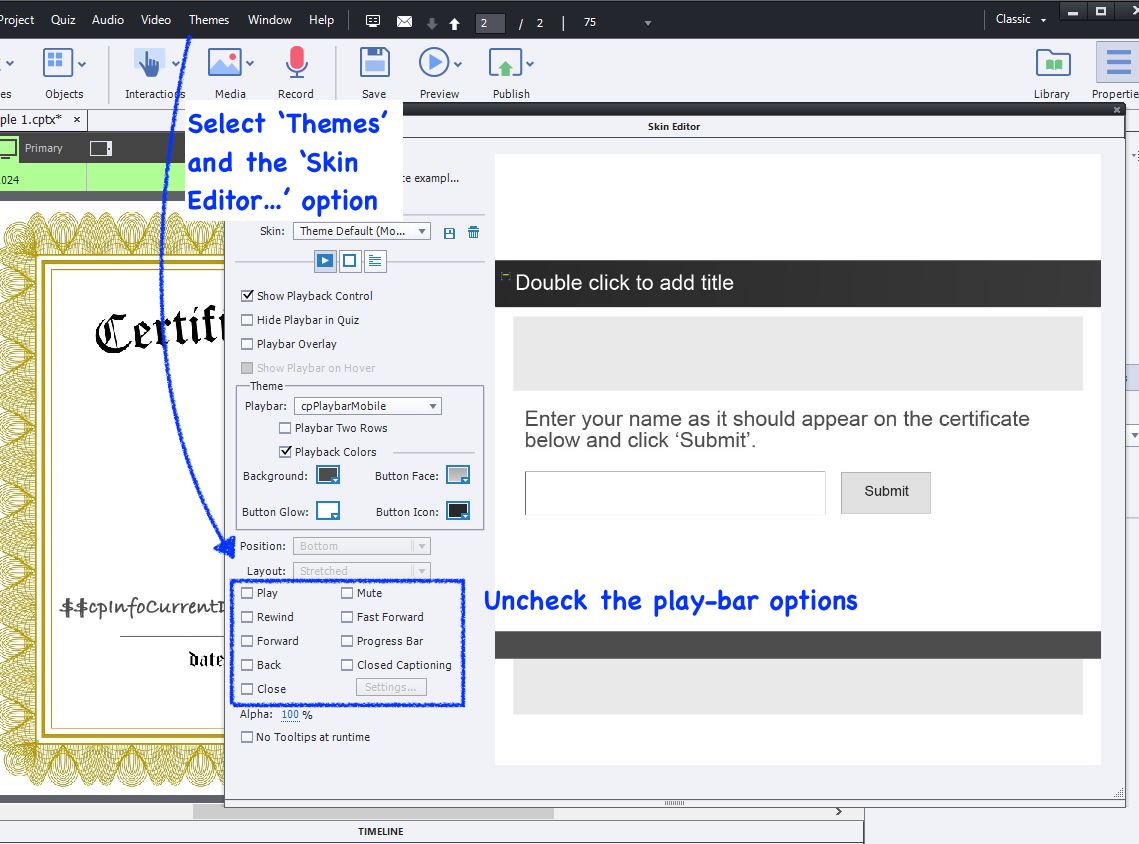
Fig. 8
Add a signature – You can add your signature by pasting a scan onto the certificate page as shown in Figure 9 below.
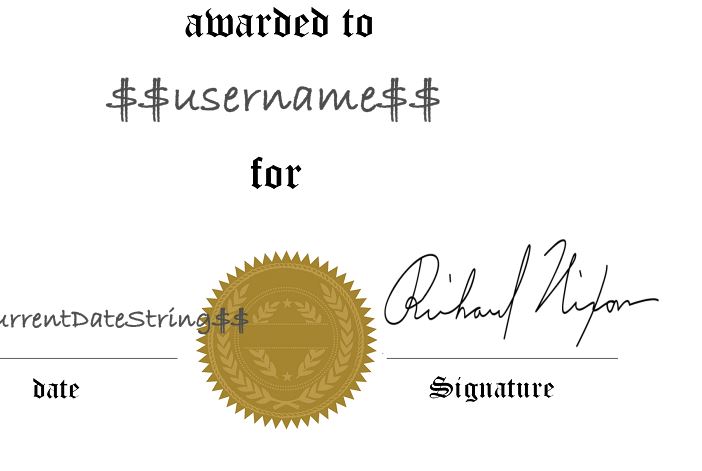
Fig. 9
Publish and view your project
Ensure you have saved your project of course and click on the ‘Publish’>’Publish for Devices’ option. I have published my file as HTML5 to have the widest possible reach. As you publish you will have the option to view the output and test the file.
Note – You can use the ‘Preview’ option in Captivate, but I have had some issues with errors using ‘Preview’ and these are documented in the Captivate Blogs. ‘Publish’ seems to be a more reliable option.
Publish to Adobe Connect – If you wish to have the content served from your Connect account (a URL) then select ‘Publish’ and ‘Publish to Adobe Connect’. The first time you publish to your Connect account you will need to enter the name of your account and the URL (Figure 10). You will be asked to login to your Connect account using your credentials and then you can navigate to the appropriate folder in your ‘Content’ tab. Select ‘Publish to this folder’ and complete the name etc.
You will finally see a URL that you can use for the self-service certificates.
Here is the example URL from the project we have used in this Blog Post:
https://getconnect.adobeconnect.com/ssce/
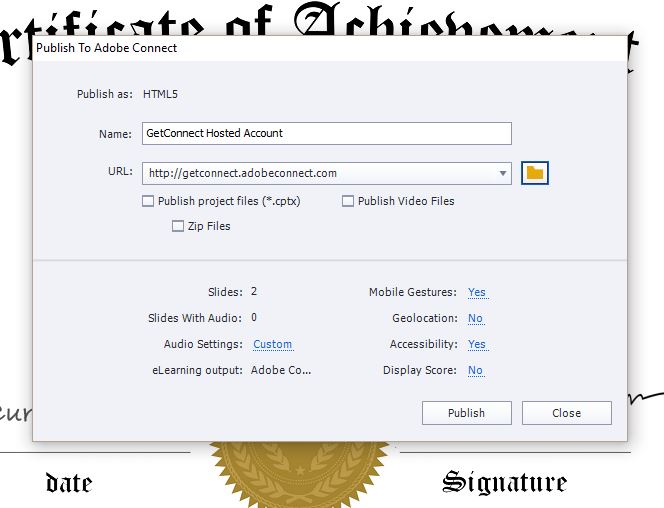
Fig. 10
Here is the finished and completed certificate (Figure 11)
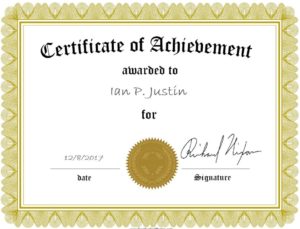
Fig. 11
Using the Self-Service Certificate
There are a few ways you might use this certificate as follows:
Adobe Connect Events – Add the certificate URL to the ‘Thank you for attending’ email template you use and those who attended the session will have the option to create their certificate and print it.
Adobe Connect Rooms – As I have used HTML5 for the format, this will not likely work directly in an Adobe Connect room (other than a Virtual Classroom from the ‘Training’ tab). I suggest you have the URL in a Chat Pod, or as a link on a PPT slide or use the Web Links Pod to launch the certificate URL.
Standalone – Include the certificate URL in an email.
Printing the Certificate – The user can just print the certificate from their browser or as a PDF. Printing is very reliant on the user-side setup at the user-side so scaling, margins, landscape etc. are all in play here. There is not really a lot that you can do from Captivate. Snapping the certificate and printing that image is pretty reliable.
Note on the ‘Captivate Print’ Option – There is a print icon that can be used in Captivate from the playbar, information on how to use this here. I was however, not able to make the print icon work myself.
Note on permissions – Be sure to manage the correct permissions for the content in your Connect account. It is likely you will want to make the file ‘Public’ or have a generic login and password for your ‘chosen’ users.
Note on Fonts – On occasion I see the font change from the font included in the certificate. I have not been able to narrow this down to a browser or setting yet. The certificate absolutely still works but the font has changed.
December 2017
<< Back to Tutorials main menu.
Member Comments
Share your thoughts. Tell us what you think about this tutorial.
Sign in to leave comments