Setting Up Universal Voice
Expertise Level: Beginner
There are three ways to provide audio in your Adobe Connect room and ensure that the recording has audio.
- Voice Over IP (VoIP): Provided at no charge to our customers, a meeting host or presenter can use a microphone - typically as part of a USB headset - to broadcast audio to all participants. A microphone button in the Adobe Connect interface toggles the audio on and off. It can be optimized for a single speaker or multiple speakers.
- Integrated Telephony: A feature that enables customers to tightly integrate and control an audio conference directly from the Adobe Connect meeting room. The room can dial-out to participants, the host can control the volume of everyone on the call and mute specific individuals. This tight integration requires a special audio bridge; so it's not available for every audio conferencing provider. Integrated telephony is available for Arkadin,Conference America, Intercall, MeetingOne and PGi.
- Universal Voice: A feature to enable Adobe Connect to dial into virtually any audio conference - even if it is not an integrated telephony provider. Adobe Connect dials into the audio conference as an additional participant - so the host doesn't get the same level of control over the audio as they might using Integrated Telephony. The audio can be broadcast via VOIP meaning that participants don't have to dial in at all, they can simply listen via their computer speakers. Participants on VOIP can hear those on the phone and vice versa.
In this tutorial, we'll look at how to use Universal Voice. We'll walk through the steps of creating an audio profile and associating it with your Adobe Connect meeting room. Since Adobe Connect rooms are persistent, you should only ever need to complete these steps once.
1. Creating an audio provider.
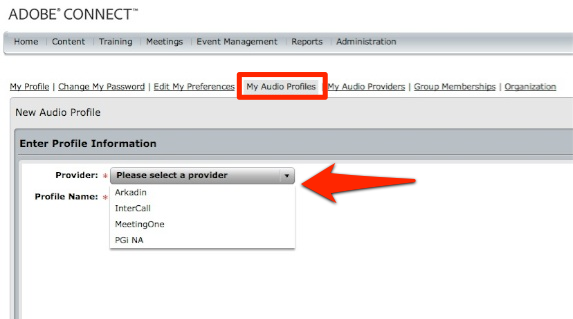
Ideally, you won't need this step at all. Your Adobe Connect administrator can enable any of the integrated telephony providers and create universal voice providers that everyone on the account can use. To see which audio providers are available, click on the 'My Profile' link in the top right hand corner of your screen, and choose 'My Audio Profiles'. You'll see a list of audio profiles that have already been setup specifically for you. Click on the 'New Profile' button, then choose the 'Provider' drop down listbox to see what other audio profiles are available. If the audio provider you want to use is in this list, select it and proceed to step 2.
In this tutorial, we'll assume that your administrator has not set up an audio provider for the audio conference you'll need. The good news is that all meeting hosts can also create their own audio providers and profiles. To do so, click on 'My Audio Providers' and then 'New Provider'
Give the new provider a name - this can be anything you want to describe the audio provider.
Set the status to 'Enable'
Optionally, you can enter a URL that participants can use if they're having difficulty dialling in.
The next section allows you to enter some dial-in numbers. These are not used by Adobe Connect to dial into the conference - these are simply numbers your participants will see as dial-in instructions. You can enter a different toll free number for each region or you can even type in a message asking people to listen via VOIP if you don't want them dialling in at all.
Finally, you can add a set of dial-in steps. These steps instruct Adobe Connect how to join your audio conference. Use a 'DTMF' (Dual-tone multi frequency) command for any phone keys you need. You'll need to be exact and make sure you include any delays, special characters (users often need to hit "*" or "#" on their phone).
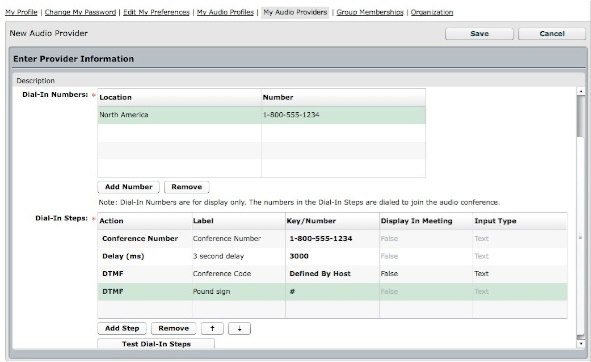
In some cases, the variables might change - for example, you may have several conference codes or passwords that you want to use. These variables don't have to be hard-coded into the provider information. You can specify that a DTMF action will be defined by the host. We'll see that in our example.
Once you've completed entering your steps, test them using the 'Test Dial-In Steps' button, then save your new audio provider.
2. Creating an Audio Profile.
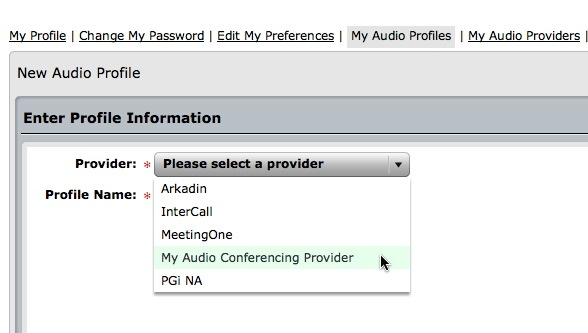
Now that you have an audio provider, you can quickly set an audio profile. Click on the 'My Audio Profiles' link, then press the 'New Profile' button. Choose the appropriate audio provider from the drop down list, then give your new profile a name. This profile is specific to you, so you might use your own name in the profile name (i.e. Alistair's Verizon Audio).
There may or may not be additional fields to fill out at this point depending on how the audio provider was set up. It's likely you'll have to enter a conference code and perhaps a password to complete the profile. Once you've finished completing the form, click 'Save'.
3. Associating your Adobe Connect room with your new profile.
Now we have the profile created, we can associate it with one or more Adobe Connect rooms. Click on 'Meetings', then choose to edit your existing Adobe Connect room by clicking 'Edit Information'.
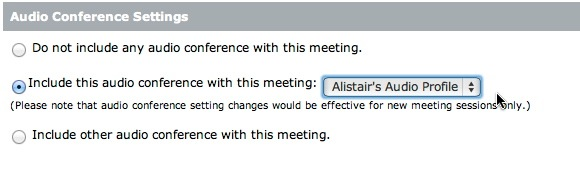
Scroll down to the 'Audio Conference Settings' section of your meeting information. Now that you have an audio profile, you should see an option to 'Include this audio conference with this meeting'. Use the drop down list box to select the correct audio profile if you have more than one. Click 'Save' to save your changes.
Note - the changes will take effect immediately if your room is closed on the server. If you were recently in your room, Adobe Connect will keep it open for a few minutes in case you were disconnected accidentally. For that reason - you might notice it will take 10-15 minutes for audio changes to take effect.
You can repeat step 3 for as many rooms as you'd like. If multiple meeting hosts on the account want to use the same provider, speak to your administrator about creating a provider that everyone can use; this will enable you to skip step 1.
October 2012
<< Back to Tutorials main menu.
Member Comments
Share your thoughts. Tell us what you think about this tutorial.
Sign in to leave comments