Getting started with a new Adobe Connect trial
Alistair Lee, Adobe Systems
Expertise Level: Beginner
Welcome to Adobe Connect
An Adobe Connect trial is the best way to experience the product. This tutorial will help you setup your first meeting and get started.
Your free trial is available for 30 days, and it comes with virtually all Adobe Connect capabilities available.
Accessing your trial account
Your account details, including the URL and your username and password should arrive via email. Check your spam folder if you haven't received the email within 30 minutes. For the trial, you account URL is randomly generated, but this is something you can customize with a full Adobe Connect account. Click the URL and sign in with the username and password provided.
As an administrator of this account, your first experience will be slightly different than the other users you set up. Let's begin by creating our first meeting.
Create a new meeting room
To create a room, you can click the 'Meeting' button. All meeting rooms are stored under the 'Meetings' tab. Each meeting host has their own 'My Meetings' folder. Meetings can also be added in the 'Shared Meetings' folder to give multiple hosts access to them, and as an administrator, you can access other users meetings by clicking on the 'User Meetings' tab. Click the 'Meeting' button on this page to create a new meeting.

This opens up a new meeting wizard. While there are lots of options available, the only field we need to fill out is a meeting name. Take a second to give your new room a name. The meeting we're about to create is persistent. That means we can re-use it over and over again instead of setting up a new virtual meeting room every time we want to meet. For that reason, it's a good idea to give your meeting room a custom URL; it will make it easy to remember. That's it. Scroll to the bottom of the page and click 'Finish'.
Using your room
You've just created your first meeting room. Click on the room URL to enter the room. I'd recommend checking out the meeting room overview to learn more about what you can do in your first Adobe Connect meeting, but let me introduce you to some basics.
Pods
In Adobe Connect, all of the functionality is delivered through pods. Different pods can be used for sharing your screen, showing your webcam, chatting, polls, sharing files, and lots more.
Each of the pods can be moved and resized on what we call the stage. As a meeting host, you have complete control over the look and feel of the meeting room. Simply drag and drop a pod to move it. Click and drag one of the corner handles to resize it. It works just like a window on your operating system.
Every pod also has an options menu. This menu changes based on the type of pod you're using, but it can always be used to hide your pod. This doesn't delete your pod or it's contents - it just removes it from the stage.
To add a new pod, or bring back a pod you've hidden, use the 'Pods' menu at the top of the screen in the Application Bar. As the host of the meeting, you're the only one with access to the Pods menu and you're the only one who can move and resize the pods.
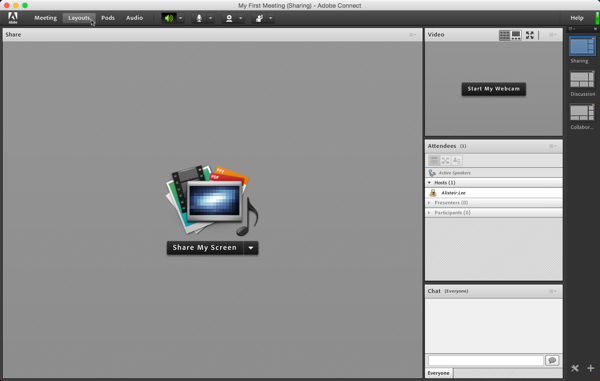
Layouts
With so many great pods, it may be tough to fit them all on the stage at the same time. While you can add and hide pods during a live meeting, Adobe Connect also provides layouts which let you setup different layouts of pods on your stage. This new meeting we created was based on the standard meeting template. To learn more about meeting templates, checkout this video. It has three layouts and I can see them all in this sidebar. To move from one layout to another, simply click the template in the sidebar, or use the Layouts menu to choose a new layout.
You can use the same pods between layouts or choose different pods. The layouts are persistent - just like everything else in your room and you can use them in lots of different ways.
You might use layouts to structure your meeting or webinar. For example, you could create a lobby layout, an introduction layout, a presentation layout, a screenshare layout and a Q&A layout.
Or you could use a different layout for the different people and teams you meet with in your persistent meeting room. Each layout would contain notes specific to those team meetings.
To add a new layout, click the plus symbol on the bottom of the layout bar or choose 'Create New Layout...' from the Layouts menu. You can start with an empty stage or duplicate an existing layout to get started. Give it a name and click 'OK'.
The fastest way to delete a layout is by clicking the 'x' in the layout bar when you hover over the layout thumbnail you'd like to remove. To reset your room to it's original layouts without deleting your content, click the 'Reset Layouts' option in the Layouts menu.
To learn more about layouts, watch this short video.
Preferences
We've only just scratched the surface of your Adobe Connect meeting room. Launch the preferences dialog by clicking on 'Preferences...' under the Meeting menu to personalize your room with a wallpaper image and browse through some of the other options available.
Adding more users
As an administrator, you're able to create new users and groups on the Adobe Connect account. To do so, click on the 'Administration' tab in Adobe Connect Central. This Administrative section can be used to customize your Adobe Connect account and can also be used to turn off or limit features for compliance reasons. To add a new user or group, click on the 'Users and Groups' link.
Since this is a new trial, there should only be a single user in the account - that's you. There are a number of system groups available and these system groups determine the permissions of every user. For example, a member must be part of the 'Meeting Hosts' groups to be able to create a meeting and a member of the 'Training Managers' group to create a course or curriculum. The Limited Administrators group enables you to give specific users some administrative capabilities without making them full administrators.

We can add new users in bulk, or one at a time. You'd click the 'Import' link to upload a comma separated values (CSV) file of bulk users. To create a single new user, select the 'New User' button at the bottom of the screen. This will open a two step wizard. Enter a new users information on the first screen like their name, email address and password. By default, email addresses are used as the user login. Password policies can also be edited by an administrator if you'd like to enforce a certain length, complexity or duration.
On the next page, we can choose which groups we want to add the new user to. Since you want your new user to create their own personal meeting rooms, let's add them to the 'Meeting Hosts' group.
To learn more about users and groups, watch this video.
Integrating audio
There are several ways to integrate audio in your Adobe Connect meetings. The easiest is to use the free out-of-the-box Voice over IP (VoIP).
If you'd prefer to use a telephone conference though, you can setup audio profiles that Adobe Connect can use to make sure audio will be recorded.
Although each user can setup his or her own audio profile, as an administrator you can create shared profiles and providers to make this easier. Under Administration, click on 'Audio Providers' to see a list of integrated audio providers that work with Adobe Connect out of the box. Click to enable any of these audio providers with your account.
If your audio conferencing provider isn't in this list, you can add a new one by clicking on 'New Provider' and setting it up yourself. This video will walk you through that process.
Each user - including you - can then add their audio profiles in the 'My Profile' section of Adobe Connect. Click 'My Profile' and choose 'My Audio Profiles'. Add a new profile here to make it available for all of your meetings. Watch this video to learn more about setting up audio providers.
April 2015
<< Back to Tutorials main menu.
Member Comments
Share your thoughts. Tell us what you think about this tutorial.
Sign in to leave comments